
Turn on Screen Record on Iphone: Quick Activation Steps
So you’ve always wondered how to turn on screen record on your iPhone, but you’re not quite sure where to start. Well, fear not! In this discussion, we’ll walk you through the quick activation steps that will have you recording your screen in no time.
But it doesn’t stop there – we’ll also show you how to customize your control center and access your recorded screen videos.
Get ready to take your iPhone experience to the next level and unlock a whole new world of possibilities.
Check for Screen Recording Feature
To begin, check if your iPhone has the screen recording feature activated. This feature allows you to capture your screen and create videos of what you’re doing on your phone. It’s a great tool for tutorials, gaming highlights, or simply sharing your screen with others.
To check if your iPhone has the screen recording feature, go to your Control Center. Swipe down from the top right corner of your screen (if you have an iPhone X or later) or swipe up from the bottom of your screen (if you have an iPhone 8 or earlier). Look for the screen recording button, which is a circle inside a circle. If you see it, that means the feature is already activated on your device.
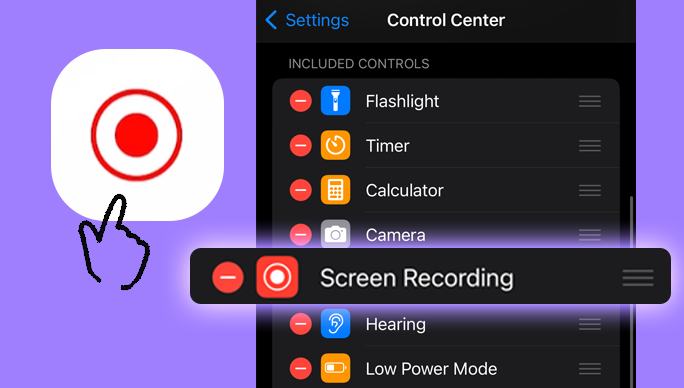
If you don’t see the screen recording button in your Control Center, don’t worry. You can easily add it by going to your iPhone’s Settings. Open the Settings app, tap on Control Center, and then tap on Customize Controls. Look for the screen recording option under the More Controls section and tap the green plus button next to it. Now, the screen recording feature will be added to your Control Center.
Once you’ve confirmed that the screen recording feature is activated, you’re ready to start capturing your screen and creating amazing videos on your iPhone.
Access the Control Center
To access the Control Center on your iPhone, simply swipe down from the top right corner (if you have an iPhone X or later) or swipe up from the bottom of your screen (if you have an iPhone 8 or earlier).
The Control Center is a convenient feature on your iPhone that allows you to access various settings and controls quickly and easily. By accessing the Control Center, you can perform tasks such as adjusting screen brightness, toggling Wi-Fi and Bluetooth on or off, controlling media playback, and much more.
To access the Control Center, follow these simple steps:
- If you have an iPhone X or later, start by swiping down from the top right corner of your screen. This will reveal the Control Center.
- If you have an iPhone 8 or earlier, swipe up from the bottom of your screen to access the Control Center.
Once you have opened the Control Center, you’ll see a variety of icons and controls that you can interact with. Simply tap on the desired icon or control to activate or adjust it according to your preferences.
Customize Control Center
Customize Control Center on your iPhone to access your most frequently used settings and controls with ease.
The Control Center is a convenient feature that allows you to quickly access various functions such as Wi-Fi, Bluetooth, and screen brightness.
To customize it, simply go to your iPhone’s Settings and tap on ‘Control Center’. From there, you can add or remove shortcuts to suit your preferences.
Want easy access to the flashlight? Just tap on the green plus button next to it.
Don’t use the camera often? Swipe left on the camera icon and tap the red minus button to remove it from the Control Center.
You can also rearrange the order of the shortcuts by tapping and holding the icon, then dragging it to your desired position.
With a customized Control Center, you can have all your essential settings and controls just a swipe away, making it even more convenient and efficient to use your iPhone.
Add Screen Recording to Control Center
If you want to easily access the screen recording feature on your iPhone, adding it to the Control Center is a simple process. With screen recording added to your Control Center, you can quickly start and stop recordings with just a few taps.
To add screen recording to your Control Center, follow these steps:
- Open the Settings app on your iPhone.
- Scroll down and tap on ‘Control Center.’
- Tap on ‘Customize Controls.’
- Under the ‘More Controls’ section, look for ‘Screen Recording’ and tap the green plus button next to it. This will add the screen recording option to your Control Center.
Once you’ve added screen recording to your Control Center, you can access it by swiping down from the top-right corner of your iPhone’s screen to open the Control Center. Look for the Screen Recording button, which looks like a circle inside a circle, and tap on it to start recording your screen.
Open the Control Center
To access the Control Center on your iPhone, simply swipe down from the top-right corner of your screen.
The Control Center provides a convenient overview of various settings and features, including the option to activate the Screen Record function.
Once you’ve opened the Control Center, you can customize it to include the tools and shortcuts that are most important to you.
Control Center Overview
Access the Control Center on your iPhone to quickly and easily manage various settings and functions.
The Control Center is a convenient feature that allows you to access commonly used functions with just a swipe and a tap.
To open the Control Center, simply swipe down from the top right corner of your iPhone’s screen. This action will reveal a panel with various icons and controls.
From here, you can adjust the brightness and volume, toggle on or off Wi-Fi, Bluetooth, and Airplane Mode, enable Do Not Disturb mode, and much more.
You can also customize the Control Center by adding or removing certain controls based on your preferences.
With the Control Center, managing your iPhone’s settings has never been easier.
Screen Record Activation
Open the Control Center on your iPhone to easily activate the screen record feature. To open the Control Center, simply swipe down from the top right corner of your iPhone screen. This action will reveal a panel of quick settings and shortcuts.
Look for the round record button with a white circle inside it. Tap on this button to start recording your screen. Once you tap the button, a countdown will appear, indicating that the recording has begun. You can now navigate through your iPhone and perform any actions you want to capture.
To stop the recording, simply tap the red status bar at the top of your screen and confirm your action. It’s as simple as that!
Customization Options
You can easily customize the Control Center on your iPhone to access a variety of useful features and shortcuts.
To open the Control Center, swipe down from the top-right corner of your iPhone screen. This will reveal a panel that contains various icons and controls.
By default, you’ll find commonly used features like Wi-Fi, Bluetooth, and Airplane Mode.
However, you can personalize the Control Center to include additional shortcuts that suit your needs.
To do this, go to Settings, then tap Control Center.
From here, you can add or remove icons, rearrange their order, and even include widgets for quick access to apps like Calculator or Notes.
With the customizable Control Center, you can have all your favorite features right at your fingertips.
Tap on the Screen Recording Icon
To activate the screen recording feature on your iPhone, simply tap on the screen recording icon in the Control Center.
This icon looks like a white circle surrounded by a red outline.
Once you tap on it, the screen recording will begin immediately, allowing you to capture whatever is happening on your screen.
Quick Activation Steps
Simply tap on the Screen Recording Icon to quickly activate screen recording on your iPhone. It’s a straightforward process that can be done in just a few seconds.
Once you tap on the icon, a countdown will begin, giving you a few moments to prepare before the recording starts. You’ll also see a red indicator at the top of your screen, letting you know that the screen recording is in progress.
To stop the recording, simply tap on the red indicator and confirm your action. The recorded video will then be saved to your Photos app, ready for you to review, edit, or share with others.
It’s a convenient feature that allows you to capture important moments or share tutorials and demonstrations with ease.
Enable Screen Recording
To activate screen recording on your iPhone, tap on the Screen Recording Icon. This icon can be found in the Control Center, which you can access by swiping down from the top right corner of the screen (or from the bottom for older iPhone models).
Once you have opened the Control Center, look for the Screen Recording Icon, which looks like a solid white circle inside a larger circle. Tap on this icon to enable screen recording. You’ll see a three-second countdown before the screen recording starts.
To stop the recording, simply tap on the red status bar at the top of the screen and select ‘Stop.’ Your screen recording will be saved to your Photos app for easy access and sharing.
Customize Screen Recording Settings
Get the most out of your screen recording experience by customizing the settings to suit your preferences. When it comes to screen recording on your iPhone, you have the flexibility to adjust various settings to capture exactly what you want.
To access the screen recording settings, go to the Control Center by swiping down from the top right corner of your screen on iPhone X and newer models, or swipe up from the bottom of the screen on older models. Once in the Control Center, long-press or 3D touch on the Screen Recording button to bring up additional options.
One important setting you can customize is the microphone audio. By default, your iPhone will record both the system audio and any ambient sound through the microphone. However, if you prefer to record only the system audio, you can disable the microphone audio option. This is useful when you want to record gameplay or any other media without capturing external sounds.
Additionally, you can choose whether to show or hide the screen recording indicator. The indicator is a small red bar at the top of your screen that appears when you’re recording. If you find the indicator distracting, you can turn it off in the settings. This is especially helpful when recording tutorials or presentations where you want a clean and uninterrupted screen.
Start Recording Your Screen
To begin recording your screen on an iPhone, all you need to do is tap the Screen Recording button in the Control Center. It’s a simple and straightforward process that allows you to capture everything happening on your screen.
First, swipe down from the top right corner of your iPhone to open the Control Center. Look for the Screen Recording button, which looks like a circle within a circle. Tap on it to start the recording.
You’ll see a three-second countdown, giving you enough time to prepare. Once the countdown is over, your iPhone will start recording the screen. You can now navigate through different apps, open files, or perform any other actions you want to capture.
To stop the recording, simply tap the red status bar at the top of your screen and confirm your action. Your recording will be saved to your Photos app, where you can access and share it with ease.
Recording your screen on an iPhone has never been easier, so go ahead and capture those important moments.
Stop Recording Your Screen
To stop recording your screen on iPhone, simply tap the red status bar at the top of the screen and select ‘Stop Recording.’
Once you do this, the screen recording will immediately end and you’ll no longer be capturing any footage.
It’s a quick and easy way to deactivate the screen recording feature on your iPhone.
End Screen Recording
To stop recording your screen, simply tap the red status bar at the top of your iPhone screen. This red status bar indicates that your screen is currently being recorded. Once you tap on it, a pop-up menu will appear with the option to ‘Stop Recording.’ Just tap on this option, and your screen recording will immediately end.
After stopping the recording, you can find the recorded video in your Photos app under the ‘Recents’ album. From there, you can share, edit, or delete the recording as desired.
It’s important to note that when you stop the screen recording, your iPhone won’t automatically save the video unless you choose to do so. So make sure to save it if you want to keep a copy of the recording.
Stop Recording Screen
To end the screen recording on your iPhone, simply tap the red status bar at the top of your screen indicating that your screen is currently being recorded. This red status bar appears automatically when you start recording your screen.
So, when you’re ready to stop the recording, all you need to do is locate the red bar at the top of your screen and tap on it.
After tapping, a pop-up window will appear giving you the option to stop the recording. Simply tap on the ‘Stop’ button, and your screen recording will come to an end.
Once you stop the recording, the video file will be saved to your Photos app, allowing you to access and share it whenever you want.
Deactivate Screen Recording
To stop recording your screen on iPhone, simply tap the red status bar at the top of the screen displaying the current recording. When you tap the red status bar, a menu will appear with options related to the recording. Look for the ‘Stop Recording’ option and tap on it.
Once you tap on ‘Stop Recording,’ the screen recording will immediately stop, and the recording will be saved to your device’s Camera Roll.
It’s important to note that when you deactivate screen recording, you won’t be able to resume the recording from where you left off. You’ll need to start a new screen recording if you want to continue capturing your screen.
Access Your Recorded Screen Videos
You can easily access the screen videos that you have recorded on your iPhone. Once you have finished recording a screen video, it’s conveniently saved in your Photos app.
To access your recorded screen videos, simply open the Photos app and navigate to the ‘Albums’ tab at the bottom of the screen. Next, scroll down until you find the ‘Media Types’ section and select ‘Videos’. This will display all the videos on your iPhone, including the screen recordings.
Alternatively, you can also access your recorded screen videos by using the ‘Search’ feature in the Photos app. Simply tap on the search bar at the top of the screen and type in ‘Screen Recordings’. The Photos app will then filter the results and display all the screen recordings that you have made.
Once you have found the screen video that you want to watch, simply tap on it to open and play it. From there, you can enjoy your recorded screen video and share it with others if desired.
Accessing your recorded screen videos on your iPhone is quick and easy, allowing you to relive and share your favorite moments captured on your device.
Frequently Asked Questions
Can I Record My Screen on an Iphone Older Than the Iphone 6?
Yes, you can record your screen on an iPhone older than the iPhone 6. Just go to your Control Center, tap the Screen Recording button, and start capturing your screen.
Is There a Time Limit for Screen Recording on an Iphone?
Yes, there is a time limit for screen recording on an iPhone. The maximum duration is 30 minutes. After that, the recording will automatically stop, but you can start a new one if needed.
Can I Record Audio Along With the Screen Recording?
Yes, you can record audio along with the screen recording on your iPhone. Simply enable the microphone option in the Control Center before starting the screen recording.
How Much Storage Space Do Screen Recordings Take up on an Iphone?
Screen recordings on your iPhone take up varying amounts of storage space depending on the length and content of the recording. Longer recordings with more movement or complex visuals will require more storage.
Can I Edit My Screen Recordings Directly on My Iphone?
Yes, you can edit your screen recordings directly on your iPhone. There are built-in editing tools that allow you to trim, crop, add annotations, and even apply filters to your recordings.
Conclusion
In conclusion, turning on screen record on your iPhone is a simple and convenient process. By accessing the Control Center and customizing its settings, you can easily add the Screen Recording feature. Once activated, you can start and stop recording your screen with ease.
It’s a useful tool for capturing important moments or sharing tutorials and gameplay. Accessing your recorded screen videos is also straightforward, making it easy to review or share them.